Influencer Media Kit: Complete Guide for Creators (+ Real Examples)
If you’ve ever wondered what actually goes inside an influencer media kit, this guide will walk you through it. By the end, you’ll know what to include, how to show your value clearly, and how to help brands quickly decide if you’re the right fit.

When a brand asks for your media kit, they want the short version of your creator business. Who are you? Who do you reach? What do you create? And does your audience make sense for their campaign?
That is why an influencer media kit is so helpful. It gives you one clean place to organize the proof a brand would otherwise have to piece together from screenshots, links, and long email threads.
A media kit will not magically land the brand deal for you. I wish it were that easy. But it does make you look prepared, and that matters. It also saves you from sending a messy thread of screenshots, links, and long explanations every time someone asks for your numbers.
Whether you are creating your first influencer press kit or cleaning up the one you already send, the goal is simple: make the next step easy for the right brand.
What Is an Influencer Media Kit?
An influencer media kit is part business card, part portfolio, and part audience snapshot. It is the page or document you send when a brand wants to understand your creator work without digging through every platform you are on.
A media kit usually includes a short bio, audience demographics, engagement metrics, content examples, past brand collaborations, deliverables, optional rates, and clear contact details. The point is not to include everything you have ever done. The point is to make the important parts easy to understand.
Why Every Creator Needs a Media Kit in 2026
If you want to work with brands, having a media kit is one of those things that makes you look like you came prepared. It does not matter if you are a nano creator, a micro influencer, or already booking paid campaigns. You still need a clear way to package your best proof.
In 2026, brands move through creator lists quickly. Your media kit helps them scan the essentials, understand your fit, and forward your pitch to the team behind the campaign.
What to Include in an Influencer Media Kit
A Short Creator Introduction
Start with a short introduction that tells brands who you are without turning your media kit into your life story. A few clear sentences are enough.
Share your niche, where you are based if it matters, who you create for, and what your content helps your audience do. The more specific you can be, the easier it is for a brand to understand where you fit.

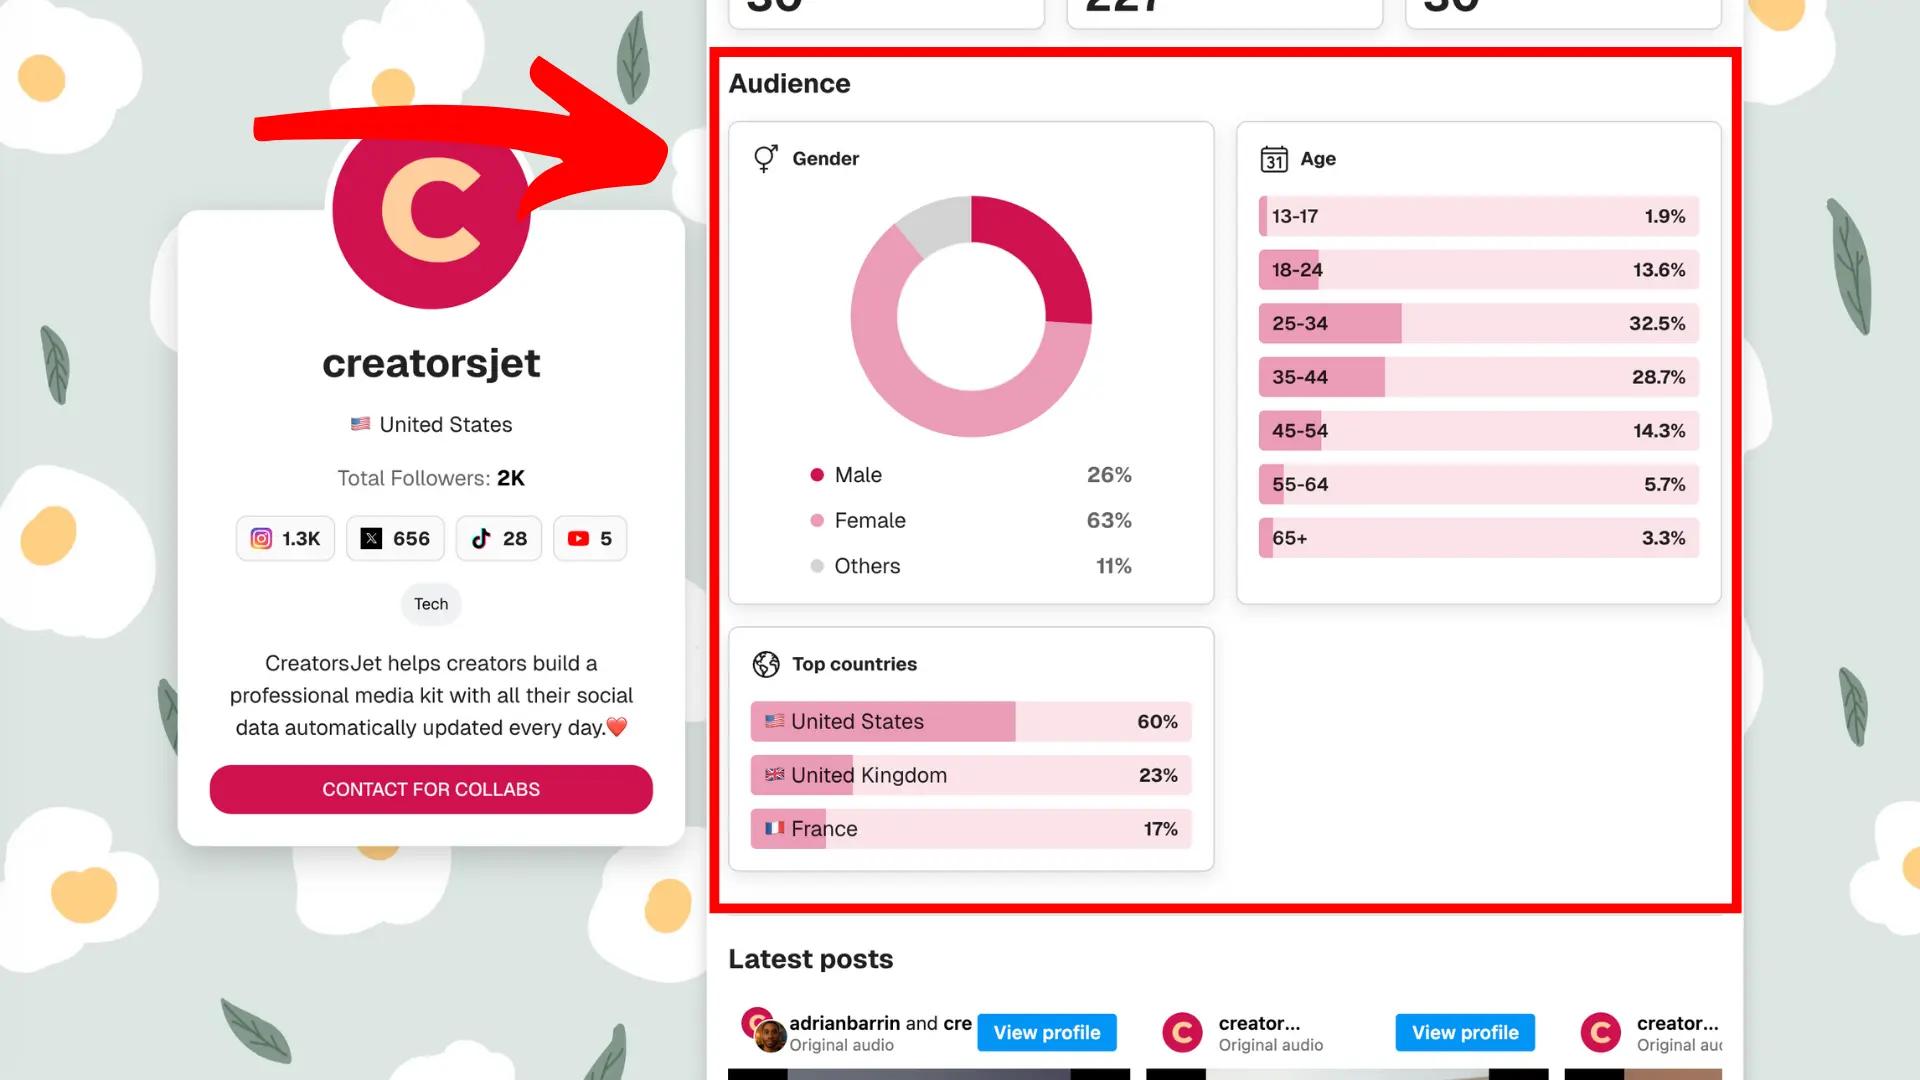
Audience Demographics
Demographics matter because brands are not only buying content. They are trying to reach the right people.
Include the audience details you actually know: top locations, age range, gender split, language, or interests. Keep it simple and useful. A brand should be able to scan this section and quickly know if your audience matches their target customer.
Social Media Stats and Performance Metrics
This is usually the section brands look for first. They want to see your follower count, reach, views, engagement rate, and any other numbers that show how your content performs.
Do not feel like follower count is the only number worth sharing. If you have a high engagement rate, steady video views, website clicks, email subscribers, or high saves, lead with that. Your best numbers should not be buried.

Content Examples Brands Can Picture Themselves In
Your content examples help brands imagine what a collaboration with you could look like. Choose posts that show your style, quality, and how naturally you can talk about a product or idea.
You do not need to include every post you are proud of. Pick a few relevant examples and add a little context if it helps: what the content was about, why it worked, or what result it got.

Past Brand Collaborations
If you have worked with brands before, include that proof. It gives future partners confidence that you know how collaborations work and can deliver professionally.
If you are newer, that is okay. Use UGC samples, affiliate content, personal projects, or high-performing organic posts that show the kind of work you can create for a brand.

Services and Deliverables
Do not make brands guess what they can book. List the services and deliverables you offer, whether that is sponsored posts, short-form video, UGC, blog content, event coverage, or something else you do well.
You can include pricing here or save rates for later. What matters most is that the brand understands the options and what each collaboration could include.

Contact Information
This sounds obvious, but do not make people hunt for your contact information. Add a professional email, your main social handles, your website if you have one, and a clear next step for brand inquiries.

What Highlights to Include in Your Influencer Media Kit
Your influencer media kit is the place to show the work that makes a brand take you seriously. If you have won an award, worked with a brand you are proud of, been featured somewhere, or created a campaign that performed well, mention it.
These highlights help build trust before a brand ever replies to your pitch. They show that other people have noticed your work, hired you, featured you, or trusted you with a collaboration.
Highlights worth adding to your influencer media kit include:
- Awards and accolades
- Brands you have worked with
- Press, podcasts, interviews, or publications you have been featured in
This does not need to be complicated. A few brand logos, a short awards list, or a handful of press mentions can be enough. Just keep it honest. Brands can usually verify this information quickly, so your media kit should build credibility, not create questions.
What Deliverables to List in Your Influencer Media Kit
Deliverables are gold in an influencer media kit because they show brands exactly how they can work with you. A lot of brands assume creators only offer a post, a Reel, a TikTok, or a YouTube mention. If you can offer more than that, make it clear.
Think through the content you already create well and the formats you have real experience delivering. If you create UGC, write blog posts, run a newsletter, shoot product photos, cover events, or offer usage rights, those options belong in your media kit.
Influencer deliverables you may include:
- Sponsored social posts, Reels, TikToks, Shorts, or YouTube integrations
- UGC, product photography, blog posts, newsletters, or event coverage
- Usage rights, whitelisting, affiliate campaigns, bundles, or long-term partnerships
Only list deliverables you can actually produce well. You can always add more as your experience grows. The goal is to give brands options while staying honest about what you can confidently deliver.
What We Have Learned From 11,676+ Creators
11,676+
7,690+
Up to 4x
After seeing 11,676+ creators and 7,690+ media kits created on CreatorsJet, the pattern is pretty simple: brands respond better when they do not have to work hard to understand you.
The media kits that perform best are clear, current, and easy to scan. They tell the brand what kind of creator you are, show the numbers that matter, and give enough proof to make the next step feel obvious.
Creators who make that information easy to review have reported up to 4x higher conversion when pitching brand deals. Not because the media kit does all the work, but because it removes confusion from the conversation.
Conversion measured through positive brand replies and deal progression signals.
Common Mistakes to Avoid When Creating an Influencer Media Kit
The first mistake is trying to include everything. I get it, you want brands to see all the work you have done. But most people are skimming. A clear media kit with the right information will always beat a crowded one.
The second mistake is using old numbers. If your follower count, engagement rate, or audience data is outdated, it quietly chips away at trust. Update your media kit before you send it, especially if you are pitching a paid collaboration.
Another mistake is leading with follower count and stopping there. A smaller audience that is engaged and aligned with the brand can be much more valuable than a big audience that does not fit the campaign.
Design can also get in the way. Your media kit should look polished, but it should not be so busy that the important details are hard to find. Simple, clean, and easy to read is usually the better move.
And finally, do not treat your media kit like something you make once and forget about. As your content, audience, rates, and collaborations change, your media kit should change with them.
How to Send Your Influencer Media Kit to Brands
Cold Pitching Best Practices
When you pitch a brand cold, do not just drop your media kit link and hope they connect the dots. Tell them why you are reaching out, why their brand makes sense for your audience, and what kind of collaboration you have in mind. Keep it short. A few thoughtful sentences will usually do more than a long email full of every detail.
Email Templates That Work
A simple email framework works best: quick intro, genuine brand connection, one proof point, your media kit link, and a clear next step. For example, you might end with, “If this feels aligned, I’d love to send over a few campaign ideas.” Make it easy for the person reading to say yes, reply, or forward it to the right contact.
Follow-Up Strategy
If you do not hear back, follow up after 5-7 business days. I like to bring something new to the follow-up: a recent post result, a seasonal idea, or a simpler collaboration angle. Two thoughtful follow-ups are fine. After that, let it breathe and move on to the next brand.
Influencer Media Kit FAQ
- Do I need a media kit if I’m a nano or micro creator?
- Yes. Honestly, smaller creators may need a media kit even more because it helps you lead with the things brands cannot see from follower count alone: audience fit, engagement, content quality, and how easy you are to work with.
- Do I need an influencer media kit template to get started?
- No. A template can help if you are staring at a blank page, but the template is not the magic part. What matters is that your media kit is clear, current, and easy for a brand to understand.
- Should I include my rates?
- You can, but you do not have to. If your pricing is pretty consistent, adding starting rates or packages can save time. If every campaign is different, it is perfectly fine to say rates are available on request.
- Is a media kit better as a link or a PDF?
- Both can work. A link is easy to share in emails and DMs, and a PDF can be helpful when a brand specifically asks for an attachment. The format matters less than the clarity of the information inside.
- How often should I update my media kit?
- Update it any time your numbers, audience, rates, or collaborations change in a meaningful way. At minimum, check it every few months. Sending old stats is one of those small things that can make a brand hesitate.
High-Converting Media Kit Checklist
Use this checklist before sending your media kit to brands.
✔ Positioning in one sentence
✔ Updated metrics
✔ Engagement context
✔ Audience geo clarity
✔ Content proof
✔ Clear CTA
Build your professional media kit in minutes with CreatorsJet. The only media kit maker that helps creators secure more brand collaborations.
Creator Resources
Free Tools
Engagement rate calculators
Top Social Platforms
Alternatives
© 2026 CreatorsJet. All rights reserved.